
This is part of a book I was asked to write in 2003-2004 about open source software. Unfortunately, the book didn't end up getting published. This particlar section is from a chpater on OpenOffice.org 1.1.0, which is now completely out of date. Nonetheless, there's still some good information here that might be helpful to someone, and I thought this section might be at least of historical interest.
One of the greatest features of any good word processor—one that I can't live without—is styles. Microsoft Word calls this feature Styles and Formatting, while OOo simply refers to it as Styles. If you compose documents longer than just a page or two, you really should learn how to use styles in OOo. Although it's a pretty big feature that gives users a tremendous amount of power over the formatting and behavior of their documents, it is still possible to learn just a few basics about styles and get a lot of benefit immediately.
To begin with, what are styles? Let's look at this chapter you're reading right now. You'll notice that I have headers for all the major sections of the chapter, such as "Installation & configuration," "Set up fonts & printers," and "The importance of styles." Under each of the major sections, I use subsections; for instance, "Installation & configuration" contains under it subsections titled "Installation" and "OpenOffice.org configuration." Finally, some of the subsections themselves contain subsections; "OpenOffice.org configuration" has "Options" and "AutoCorrect/AutoFormat." If you were to outline these sections and subsections, it would look something like this:
1 Installation & configuration 1.1 Installation 1.2 OpenOffice.org configuration 1.2.1 Options 1.2.2 AutoCorrect/AutoFormat 2 Set up fonts & printers 3 The importance of styles
Items 1, 2, and 3 are all at the same level, so they are all formatted the same. Likewise, 1.1 and 1.2 are at the same level, so they are formatted similarly, as are 1.2.1 and 1.2.2. In a document of any length, I want this formatting to happen in a simple, logical fashion. Styles allow me to do this.
Instead of manually formatting items 1, 2, and 3, I simply select a style titled "Heading 1," which automatically applies the same formatting to each item. "Heading 2" gets applied to 1.1 and 1.2, while "Heading 3" works for 1.2.1 and 1.2.2. As I add new sections and subsections, the appropriate style gets used.
This really pays off when I decide that I want to change the formatting of Heading 2. I don't want it to be Arial 16 bold; instead, I want all instances of Heading 2 to be Arial bold 14. If I wasn't using styles, I'd have to walk through the entire document, manually making my changes, a tedious proposition at best. With styles, I simply change the style and wham! any words defined as using Heading 2 are changed.
Finally, styles allow me to structure my document logically. Since Heading 1 can only contain Heading 2, and Heading 2 can only contain Heading 3, and so on, it's easy for me to view outlines of my document. In fact, I can restructure my documents using those outlines by simply dragging and dropping items in the outline, and the styles are automatically updated for me. Further, I can easily create a table of contents in just seconds, as long as I've been using styles throughout my document.
Sound useful? Then let's look at some of the basic features of OOo's styles.
Different kinds of styles
In just a moment, we're going to look at using styles in OOo. Before we get into that, however, it's important to understand that OOo defines five different style categories: paragraph, character, frame, page, and numbering.
Paragraph Styles, shockingly enough, apply to entire paragraphs. If your cursor is anywhere in a paragraph and you choose a paragraph style, then the entire paragraph changes to fit that style. When you create a paragraph style, you can define not just the font, but also indentation, alignment, borders, and much, much more.
Character Styles affect words or phrases inside paragraphs. If your cursor is inside a word and you choose a character style, just that word is affected; in order to affect more than one word, you must first highlight the words you'd like to change, and then choose the character style. Creating a character style doesn't give you as many choices as when you create a paragraph style, but then again, it's a simpler thing, so you can only specify font, position, and background.
Frame Styles are used to format frames, which are boxes used to layout text and graphics in your documents. You can set the number of columns, wrapping and text flow behaviors, and other things specific to frames.
For more information about OOo frames, search OOo's Help for "frames" and "Frame Styles."
Page Styles alter entire pages in a document, which can come in tremendously handy when you're creating complicated files, such as book chapters, reports, and contracts. Very specific settings can be made, such as page orientation, margin size, headers and footers, and footnote display.
If you want to number all of your pages except your title page, here's a hint: use Page Styles.
Numbering Styles work with lists. Confusingly, this category does not just define numbered lists, but bulleted lists as well. You can define the bullet types that unordered lists use, and if the list is ordered, you can set the look and behavior of its numbers (see, learning Roman numerals in grade school pays off!). The options you get with this category are completely different than those of the other four, so be prepared.
To select a style category, click on the appropriate button at the top of the Stylist. And what's the Stylist? Keep reading!
Working with styles
To work with styles in OOo, you need to open the Stylist. To do so, either click on the Stylist button on your Function toolbar (hold your mouse over the buttons until you find the one that pops up a little tooltip that says "Stylist On/Off"), or select the Format menu and then Stylist, or press the F11 key on your keyboard. When you do so, the Stylist window should open, looking something like this:
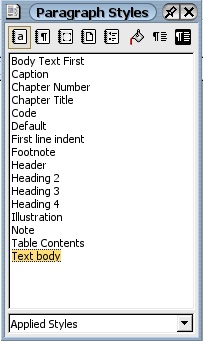
The OpenOffice.org Stylist.
At the top of the Stylist are the five buttons for the style categories, followed by three buttons for other features: Fill Format, which enables you to quickly apply a style to different areas in your document;New Style from Selection, which I'm going to cover further ahead; and Update Style, which changes a defined style to match the formatting of a selection in a file.
The Stylist window is free-floating, so drag it wherever it's most convenient for you. I like to dock it on the left side of my Writer window, so it's no longer floating and is now anchored in place, like this:
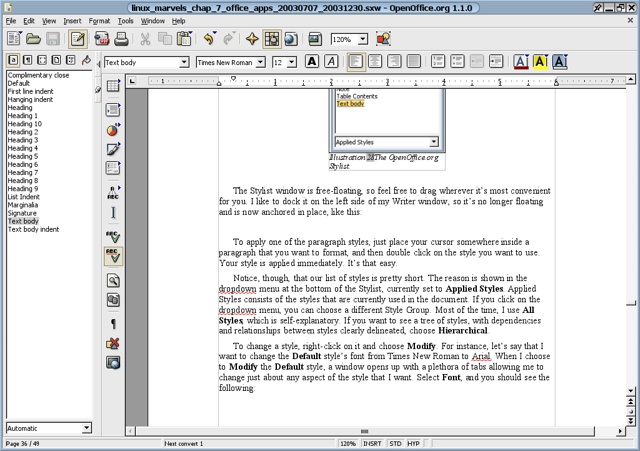
OpenOffice.org, with the Stylist docked on the left side of the window.
All of my monitors have a minimum resolution of 1024x768; if yours is smaller than that, I really wouldn't recommend docking the Stylist. If, however, you'd like to lock your Stylist in place, hold down the Control key and double-click on the border of the Stylist window. It's kind of tricky, so you might have to click around until you find the sweet spot. Once you do, though, it will instantly jump into place. To undock it so that it is once more free like the wind, simply hold down Control and click again on the border of the Stylist.
Once you have the Stylist open and in place, it's time to start using it. To apply one of the paragraph styles, just place your cursor somewhere inside a paragraph that you want to format, and then double click on the style you want to use. Your style is applied immediately. It's that easy.
Notice, though, that our list of styles is pretty short. The reason is shown in the dropdown menu at the bottom of the Stylist, currently set to Applied Styles. Applied Styles consists of the styles that are currently used in the document. If you click on the dropdown menu, you can choose a different Style Group. Most of the time, I use All Styles, which is self-explanatory. If you want to see a tree of styles, with dependencies and relationships between styles clearly delineated, choose Hierarchical.
To change a style, right-click on it and choose Modify. For instance, let's say that I want to change the Default style's font from Times New Roman to Arial. When I choose to Modify the Default style, a window opens up with a plethora of tabs allowing me to change just about any aspect of the style that I want. Select Font, and you should see the following:
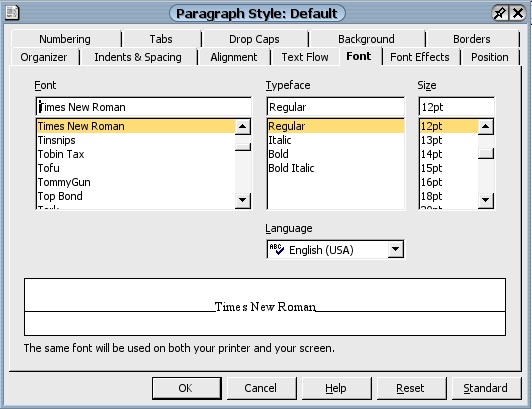
Modifying a style in OpenOffice.org.
Instead of Times New Roman, I scroll up in the Font section until I find Arial, and then choose it. If I want to change the size from 12pt to something else, that's just as easy. The other tabs in this window are pretty self-explanatory as well. When I'm finished, I press OK, the window closes, and my updates are applied.
You can also modify a style by choosing the Format menu, then Styles, then Catalog. In the Style Catalog window, find the style you'd like to change and click Modify. Make your changes and press OK, and then press OK again to close the Style Catalog window.
There are two ways to add a new style: base it on formatting you've created in your document, or create it from scratch. For the former, format your paragraph the way you'd like it to look. Set the font, the font size, the margins, and so on. Then click on the New Style from Selection button at the top of the Stylist. Give the new style a name in the Create Style window and press OK.
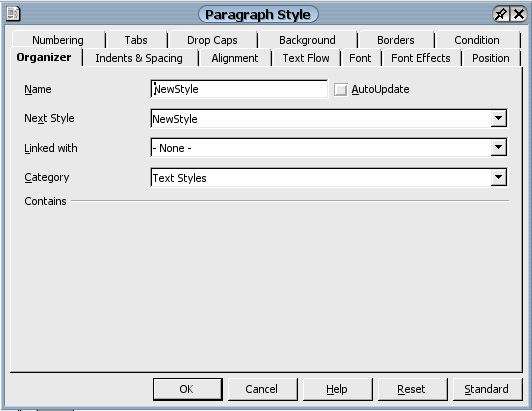
To create a style from scratch, right-click on a blank area inside the Stylist and select New. The Paragraph Style window will open.
Creating a new style in OpenOffice.org.
You need to type something in the Name field. Use something unique, and try to think of some way to differentiate your styles from other styles. One simple way to do so is to always use a small letter instead of a capital letter at the beginning of your style's name, like this: newStyleName.
If you check AutoUpdate, then any changes you make to a paragraph's formatting after you've applied the style will automatically update and change the style. This can be dangerous, so I would avoid checking this box. If you want to make changes, modify the style using the methods I just discussed.
Next Style defines what happens when you've applied your new style to a paragraph, and then press Enter to create a new paragraph. More than likely, you'll want one paragraph styled a certain way to be followed by another paragraph styled the same way, so change Next Style to the name of your new style.
Linked with defines the old style that you're basing your new style upon. Since you're creating this one afresh, you should choose - None -.
Finally, you should assign your new style to a Category. I would recommend putting it in with Custom Styles, to differentiate it from the others that are built-in to OOo.
You can also create a new style by selecting the Format menu, then Styles, then Catalog. In the Style Catalog window, press New. Create your style as you'd like, and then press OK, and then OK again to close the Style Catalog window.
After setting up the basics of your style, define it using the other tabs in the window. Once your style fits your needs, press OK to close the window, and start using your new addition to OOo.
Saving styles in templates
Once you have created a style, you probably want to use it in other documents. This is a common point of confusion: someone creates or modifies a style in a document, and then opens up a new document expecting to see the new style, and it is nowhere to be found. That's because OOo saves a style in the document that birthed it. If you want your style to be available in every document you create, you need to add it to a template.
Let's say that you need a new style—titled "command"—to be available in any new text file you create. To solve this issue, we're going to create a new default template that we'll use for all future OOo text documents. Before we can begin, though, we need to know where OOo templates are located on your system. To find the location, click on the Tools menu, and then Options. Expand OpenOffice.org in the Options window, and then press Paths under it. Look for Templates, and note the path(s) for templates. In my case, templates can go in two locations, separated by a semicolon:
- /usr/lib/openoffice/share/template/english
- /home/rsgranne/.openoffice/1.1.0/user/template
Press Cancel to close the Options windows, and let's proceed.
Now that we know where templates go, open a new blank document using the default OOo template. To open such a document, select File, then New, then Text Document, or just click the New icon on the toolbar. Define your new style in the document, and then save it as a template by choosing File and then Save As.
Saving a new template in OpenOffice.org.
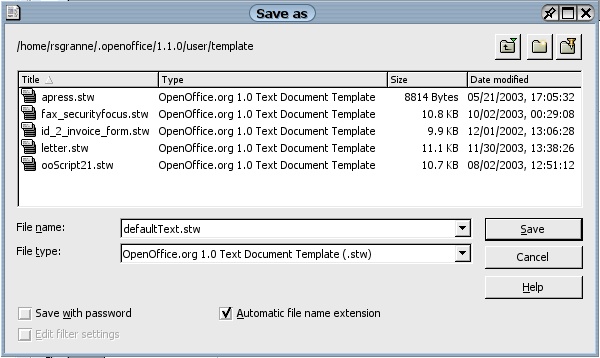
In the Save As window, navigate to the location where templates are to be stored. I recommend using the location under your own home directory, if you can, unless you're setting up a template for an entire office and want to use a shared location for everyone. Enter the File name you want to use -defaultText.stw in my case—and select OpenOffice.org 1.0 Text Document Template (.stw) for the File type. Press Save, and you've created a new template.
And how did I navigate into ~/.openoffice/1.1.0/user/template, since when you go into your home directory, subdirectories starting with a dot are hidden, making them impossible to select with a mouse? I was sneaky, and typed ".openoffice" into the File name text box and hit Enter, which took me into ~/.openoffice. From there, I navigated down into the template directory, which is where I wanted to go.
You have a new template with your new style in it, but how do you create a document from your template? If you want to use your new template on a special occasion while keeping the default OOo template—which lacks your new style—for default usage, then click on the File menu, then New, and then Templates and Documents.
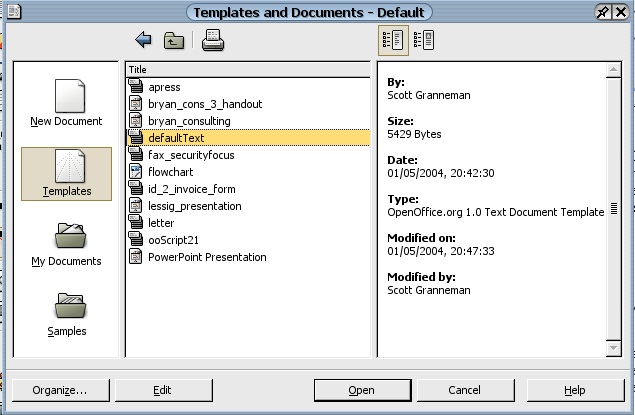
Choosing a template in OpenOffice.org.
Click on Templates on the left side of the window to select it, which will display, in the middle column of the window, some folders with names like Default and Presentations. Double-click Default, and the middle column will change to show you the templates located in the default template location. You probably will have very few in it, perhaps only defaultText (or whatever you named the template we just created). To use defaultText, double-click it, or select it and then press the Open button. You should now have a blank document in front of you, and if you check the Stylist, you'll see the style you created, just as you desired.
But what if you want defaultText to in fact be true to its name: the default text template for all documents? Choose the File menu, and then Templates, and then Organize. Double-click on Default, listed in the left side of the window, and then click once on defaultText to select it.
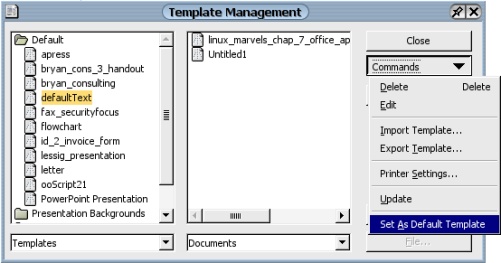
Make a template you created the default in OpenOffice.org.
With defaultText chosen, click on the Commands dropdown menu and select Set As Default Template. Press Close, and that's it. If you now open a new text document in OOo without specifying a template, it will use defaultText, with your style (and anything else you've specified in it). OOo even gives you the ability to specify a different default for word processing, spreadsheets, and presentations, so get busy and create those templates and styles!
If you later change your mind and want to go back to the original template that OOo used before you Ã≠ changed it, open the Template Management window (File>Templates>Organize), select defaultText, click on Commands, and choose Reset Default Template.
Taking advantage of styles
You've created a document and carefully used styles throughout. You've done the right thing, and it will definitely pay off if you ever decide to change how all your headers look, for instance. As you know by now, just update the appropriate style, and any elements in your document that use that style will immediately reflect your changes. That's cool, but styles actually allow you to do some things that are even more powerful, and maybe even more cool.
If you've structured your document using styles, then you've made things very easy for yourself if you want to change that structure. To see what I'm talking about, let's assume I've written a paper about five seventeenth-century British poets. I apply the style Heading 1 to the main title of the paper—Seventeenth-Century Poets—and Heading 2 to each of the poet's names: Ben Jonson, John Donne, John Milton, Andrew Marvell, and Aphra Behn. Finally, I use Heading 3 for each poem written by the poets.
Since I've carefully used styles to set up my paper, I can now use another cool feature that OOo offers: the Navigator. To view the Navigator, either go to the Edit menu, and then choose Navigator, or just press the F5 button on your keyboard, or click the Navigator icon on the Function toolbar.
You can dock the Navigator just like you can the Stylist: hold down the Control key and double-click on the border of the Navigator window. To undock it, hold down Control and click again on the border of the Navigator.
The Navigator for the paper I'm describing would looking something like this:
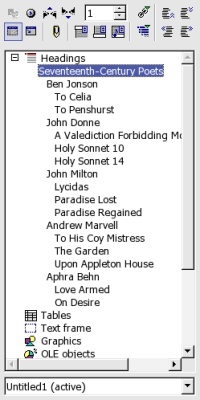
The OpenOffice.org Navigator.
Notice how I've expanded Headings, the first item listed in the Navigator. I can also use the Navigator to view a sequential list of tables, images, sections, hyperlinks, and much more. In this case, though, we're interested in the outline view that the Navigator gives us of our document. Each item is structured according to the level of its heading. This lets us see our document's structure easily, in one place, which can be tremendously helpful. But we can do more than that.
In my example, I have Aphra Behn last. Oops—that's a mistake. Chronologically, she should actually come after John Donne and before John Milton. I need to move the Behn "section" up from where it is (it's not really a section as OOo would define it; to learn more about this, look up "sections; inserting" in OOo Help). I could do this the hard way: find the paragraphs about Behn and her poems in the paper, select them all, cut them, and then paste them after Donne. But that's so crude. Let's use the Navigator instead, and put our slavish devotion to styles to good use.
Take another look at the Navigator again; in particular, notice the four small buttons on the right side of its toolbar, highlighted in red in the following image.
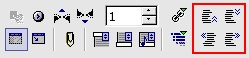
Promote and Demote buttons on the OpenOffice.org Navigator.
From the top left of those four buttons, and moving clockwise, we have Promote Chapter, Demote Chapter, Demote Level, and Promote Level. Promote Chapter and Demote Chapter move selected items up and down, respectively, but leave them at the same level; Promote Level and Demote Level move selected items left and right, respectively, changing their levels as they do so. If you promote a level, you move it up the scale, from Heading 3 to Heading 2, for instance, while demoting a level would move it down the scale, from the Heading 2 to Heading 3.
In our case, we want to promote the Aphra Behn level up two places in the list of poets. In the Navigator, click once on Behn to select her, and then press on the Promote Chapter button twice. Each time you press Promote Chapter, Behn moves upward in the Navigator; better still, you are actually moving the Behn section—and all of Behn's subsections—in the document itself. You have restructured the paper in a simple and easily understandable method. This is what computers are supposed to do: make our lives easier.
I've barely touched on all of the cool things that the Navigator can do. Definitely read more about it OOo's Help, as it is a wonderfully powerful and versatile tool. Look up "Navigator; contents as lists" in Help's Index.
Styles allow you to use the Navigator effectively, but they also enable you to create a table of contents for your document as well. It's really pretty easy to generate your TOC, but before you begin, place the cursor at the point in your document where you want the TOC to go. If you don't, your TOC could end up in a very strange place in your document. Once you've positioned your cursor, select the Insert menu, then Indexes and Tables, and finally Indexes and Tables again.
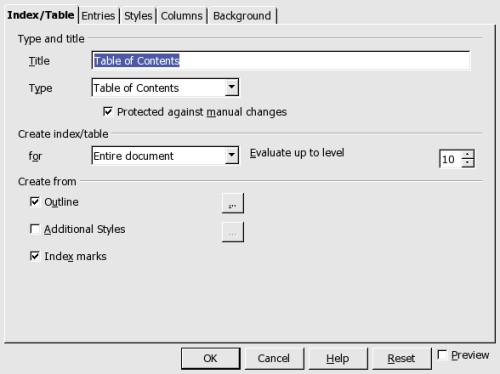
Inserting a table of contents into a document created with OpenOffice.org.
Unless you have a good reason to change it, leave the Title set to "Table of Contents," and definitely leave Type set to "Table of Contents" (thatiswhat we're creating here, remember?). I strongly recommend leaving the check intact next to Protected against manual changes, as that will prevent you from accidentally changing the text of the TOC and thus throwing things out of whack. Instead, make you changes in the document itself, to the headers, and then update the TOC. That way, everything stays organized.
For most people, the rest of the settings are correct. If you'd like to investigate any of the settings on this tab, press the Help button on the bottom.
Once you've got the settings arranged, press the OK button. Your TOC will instantly appear, at the place in which you had placed your cursor, and on its own page. Very nice.
If you make changes to the contents of your document, you're going to have to let your TOC know about them. To do so, click the Tools menu, then Update, and then All Indexes and Tables. If you're on the TOC page at the time, you should immediately see it update to reflect your changes. Alternately, you can right-click inside the TOC and choose Update Index/Table.
One final trick for your TOC: wouldn't it be neat if your TOC entries were hyperlinks to the appropriate sections of your document? In my example, clicking on "Aphra Behn" in the TOC would take you to the Aphra Behn section of the document, which could be quite handy.
To insert hyperlinks into your TOC, right-click somewhere in the TOC and choose Edit Index/Table, or click somewhere in the TOC and then go to the Insert menu, choose Indexes and Tables, and then Indexes and Tables again (yes, just like you're creating a TOC, but if it has already been created, then you can edit it). In the window that opens, select the Entries tab.
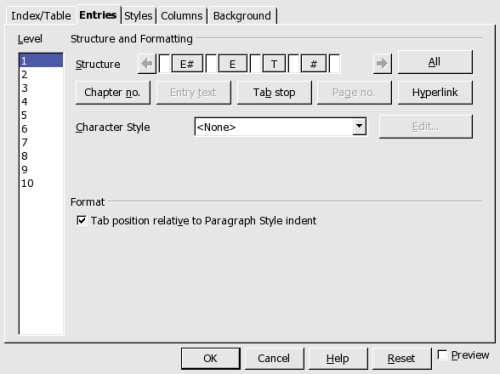
Adding hyperlinks to table of contents entries in OpenOffice.org.
This is kind of weird, but once you do it, it makes more sense. See the four buttons to the right of Structure? Those represent the items in each line of your TOC. E# is the chapter number, if you're using those;E is that actual entry, the name of the item that's in the TOC;T represents the tab stops that between the entry and the page number; and # is the page number for the entry.
To turn E into a hyperlink, place your cursor in the white box just to the left of E and then press the Hyperlink button. Immediately you should see LS(for Link Start), surrounded by white boxes, appear after E# and before E. Now place your cursor in the white box to the right of E and press Hyperlink again, which puts LE(for Link End) in place. The end result should look like this:
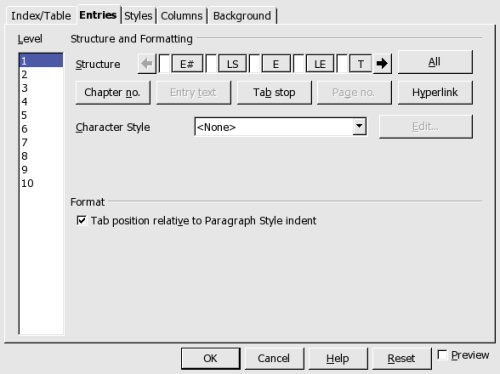
The result of inserting hyperlinks into a table of contents in OpenOffice.org.
If you just want TOC entries created from Heading 1 to be clickable, then leave 1 selected on the left side of the window, under Level. If you wanted levels 1 and 2 to be clickable, but no others, then you'd have to repeat the steps for level 1 again for level 2. If you're like most people, though, and you just want all levels to be linked, but you don't want to have to manually set each and every one, just press the All button. The settings now apply to levels 1 through 10, corresponding to Heading 1 through 10.
Yes, it is possible to remove the underline under each entry that hyperlinking inserts. After you turn a level into a hyperlink, the Character Style changes to Internet Link. Click the Edit button to the right, select the Font Effects tab in the resulting window, and then change Underlining to (Without). Press OK, and no more ugly underlining.
Click OK, and your TOC should now be clickable. Try it—click on an entry, and instantly you jump to that part of your document. If you've got a long, complicated document, this can really make it easier to use and more pleasant to read.