
This is part of a book I was asked to write in 2003-2004 about open source software. Unfortunately, the book didn't end up getting published. This particlar section is from a chpater on OpenOffice.org 1.1.0, which is now completely out of date. Nonetheless, there's still some good information here that might be helpful to someone, and I thought this section might be at least of historical interest.
The big kahuna, though, is at Tools, AutoCorrect/AutoFormat. There's a lot to do here, and for many readers, these next several paragraphs are going to help them iron out some major annoyances they may have with OOo. Personally, the very things a lot of people hate are the things that I really love about OOo. There's that choice thing again!
Let's start with the first tab, Replace.
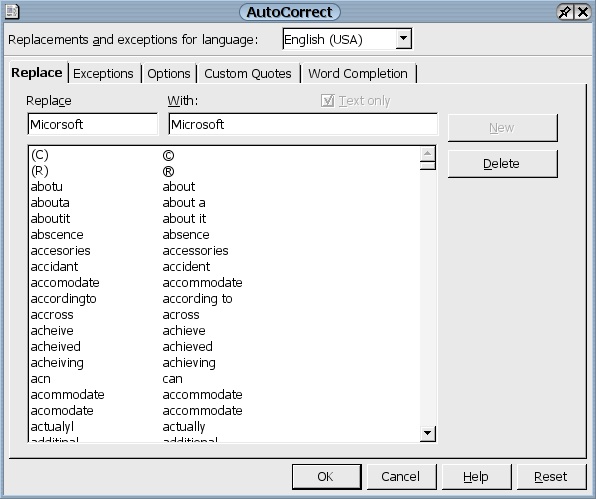
Automatically replace common mistakes or abbreviations in OpenOffice.org.
I'm a decent typist, but there are certain errors I keep making, over and over again. I commonly type "teh" instead of "the," "nad" instead of "and," and "inventor of the Internet and computers" instead of "Bill Gates" (you do \1now I'm just kidding about that last one, right?). As I've been working on this chapter, I found myself typing "Micorsoft" instead of "Microsoft" once too often. After doing that a couple of times, I went into this window and entered "Micorsoft" in the Replace box, followed by the correct spelling in the With box. I pressed New, and it was done. Now whenever I type "Micorsoft" followed by a space or Enter, OOo changes my mistake into the name of our favorite monopoly.
For this to work, you need to go to the Options tab and check the boxes next to Use replacement table.
If I ever want to edit my replacement, I just find it in the list, select it, and make my change in the With textbox. If I want to delete it, I select it in the list and press Delete. If you're a heavy user of OOo, you're going to find this feature indispensable.
The next tab is Exceptions.
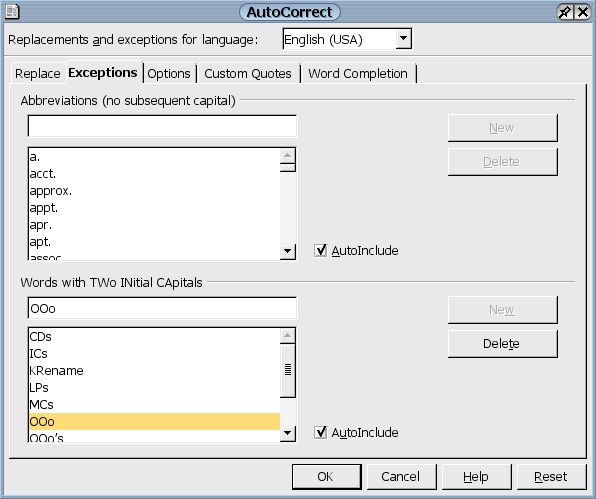
Exceptions to AutoCorrect in OpenOffice.org.
This tab allows you to define exceptions to the rules you set elsewhere in AutoCorrect. For instance, AutoCorrect normally will detect a period and then automatically capitalize the next word for you, if you fail to do so yourself. However, you obviously don't want abbreviations to be considered as the end of a sentence, so you can define abbreviations here that will not trigger automatic capitalization. Likewise, AutoCorrect will fix two initial capitals as a misspelling, but some words actually begin with two capitals, like "OOo" or "KRename," and you don't want those "fixed." Add those words here manually, and you won't be bothered again when you type them.
For these two features to work, you need to go to the Options tab and check the boxes next to Correct TWo INitial CApitals and Capitalize first letter of every sentence.
If you check AutoInclude, then telling the OOo spellchecker to ignore or add abbreviations or words beginning with two capitals will also add them automatically to the two lists on the Exceptions tab.
The Options tab is where you enable or disable the features you'd like AutoCorrect to perform.
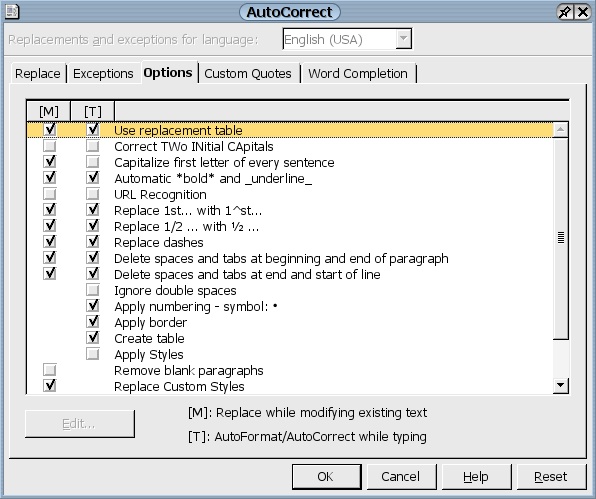
Options that determine how AutoCorrect is going to work in OpenOffice.org.
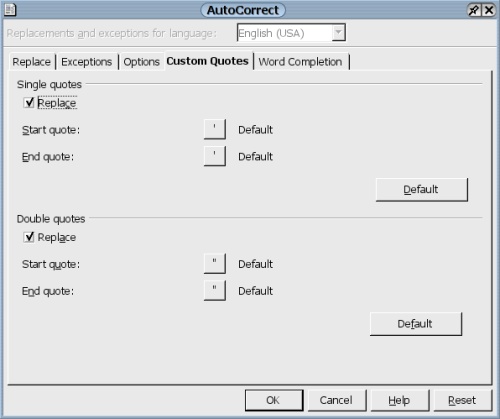
Since the Options tab is so long, let's also include the options that you would see when you scroll down.
![]()
Still more Options for AutoCorrect in OpenOffice.org.
Before proceeding, notice the [M] and the [T] columns. [T] is easy to understand: basically, do you want changes to happen automatically while you're typing or not? For instance, if you have the box next to Capitalize first letter of each sentence checked in the [T] column, and you type "Run Spot run. see Spot run," then AutoCorrect will immediate change "see" to "See" as soon as you've finished typing the word. If you check items in the [M] column, then changes only get applied when you select the Format menu at the top of OOo, then choose AutoFormat, and then Apply, or Apply and Edit Changes if you want to review what's about to happen to your document.
We've already looked at the first three options as we changed settings on the first two tabs of AutoCorrect. Let's proceed down the list, looking at some of the other settings that we can choose.
Automatic *bold* and _underline_ enables you to use symbols instead of the keyboard or the toolbar. For instance, if you want to bold something that you're typing without actually having to choose the Format menu, then Character, then Bold, or without having to click on the Bold button on the toolbar, then just type asterisks around the words you wish to make bold, and OOo will automatically make it so. I find this useful, so I leave it turned on.
Sometimes you might want to tell OOo not to automatically format something you've just typed. In those cases, after OOo makes the change that you don't want, just hit Ctrl+Z, for Undo, and OOo reverses the change, and leaves your text the way you originally entered it. What could be easier?
URL Recognition drives me batty. OOo seems to have gotten the idea for the "feature" from Microsoft Word, which was the first major program that I know of to implement it. If you've ever been typing along, and entered a URL like http://www.google.com, typed a space, and suddenly had your URL turn into an actual Web-like URL, complete with blue color, underlining, and clickability, then you've been the victim of URL Recognition. The same thing happens if you type an email address. In both cases, I find this pretty much useless, and actually annoying. If I'm typing a document, I don't want it to act like a Web page; if I want something to act like a Web page, then I'll make a Web page! Worse, when you try to click on the new link to fix it by removing the link, most of the time I end up opening my Web browser, which I then need to close. Overall, it's too much trouble for too little benefit. If you like this, however, then by all means, turn it on.
The next three options -Replace 1st… with 1^st…, Replace 1/2 … with ½ …, and Replace dashes- are all useful, so I keep them enabled. They're all pretty self-explanatory; basically, they allow you to type simple representations of more complicated formatting, and OOo translates things for you so that things look nice. Dashes in particular are handy for me. I type a word, then a space, then a hyphen, another space, and another word, and bam! OOo changes my hyphen into a dash, just like the ones in the first sentence of this paragraph.
Delete spaces and tabs at beginning and end of paragraph, Delete spaces and tabs at end and start of line, and Remove blank paragraphs are helpful, so I'd recommend leaving them checked. If you accidentally leave too much whitespace in the wrong places, these settings will take care of that for you.
The next option is more controversial, but don't worry, I'm going to leap right into the fray. Yes, you should leave Ignore double spaces checked, and here's why: you're only supposed to use one space after punctuation marks, not two. I know that about half of you are nodding your head right now, thinking to yourself, "I know that. What's the big deal?" The other half of you are thinking that you've caught me in a major boo-boo, because Mrs. Magillicuddy taught you in typing class that you're supposed to use two spaces after a punctuation mark, not one. Those of you in the former category, however, are both right and wrong. Mrs. Magillicuddy was absolutely correct when it came to typewriters: you are \1upposed to type two spaces when you're using one of those machines. But you should only use one space when you're using a computer for word processing.
Why? Because typewriters use monospaced fonts. An "a" is as wide as an "l" is as wide as an "m." They're all the same width. Therefore, to differentiate the space after punctuation from the space between words, you should type two spaces after a period or question mark or exclamation point.
Word processors like OOo (and that includes Microsoft Word), however, are different. They use fonts that are not monospaced, like the ubiquitous Times New Roman or Arial, or Bitstream's Vera Sans or Vera Serif. With those fonts, an "l" is much narrower than an "m,", and an "m" is much wider than an "a." In addition, the word processor knows that the space between words is a different beast than the space after punctuation marks, and it acts accordingly. Therefore, you need only type one space after a period (or semi-colon, or question mark, or exclamation mark), and things will look great.
You could type all your documents in OOo using a monospaced font like Courier or Bitstream Vera Sans Mono, but why in the world would you want to do that? Live a little! Try Times New Roman, or better yet, Bitstream Vera Serif. It's the 21st century … time to leave monospaced fonts in your documents behind!
Ideally, you should train yourself to use only one space instead of two, or retrain yourself if you were taught to use two. I had to retrain myself, and it took a couple of days, but after that, I was done. I don't check the box next to Ignore double spaces because I don't need to, but if you don't want to retrain yourself, then just check the box and be done with it. OOo will take care of your mistakes as you type, just like computers should.
Apply numbering—symbol: * gets my vote for worst phrasing of an option. After reading this, I wouldn't be surprised if the most common reaction by folks is "Wha?" To put it a bit more clearly, if you check this option, then typing a number at the beginning of a line, followed by a period, a space, text, and the Enter key will result in a numbered list, with the next line automatically numbered as well. To create a bulleted list, use the same process, except that instead of a number, use either a hyphen, plus, or asterisk (-, +, or *, for those of you who like to see symbols). Personally, I like this, but I can understand how some people might find it distasteful.
If you have this option enabled, but you don't want automatic numbering in a particular situation, just press Enter a second time, and it turns off until you type the same steps again.
Replace bullets with: · is closely related to Apply numbering, except that it doesn't work while you type. Other than that, it's very similar. Starting a paragraph with the same symbols I mentioned previously will result in a bulleted list.
For both of these options, if you'd like OOo to substitute a different character than a bullet, just select the option and then click the Edit button at the bottom of the window. In the new window that opens, you can select the character you'd like to use instead.
Apply border and Create table can both surprise people who aren't expecting them. Apply border enables you to turn three dashes into a horizontal rule underneath the current paragraph just by pressing Enter. Try it. Type "—-" without the quotation marks and then press Enter. You'll get this:
Pretty snazzy. I don't use horizontal rules like that all the time, but it's nice to know that they're so easy to create. It gets even snazzier, though. For fun, try typing the following, hitting Enter after each one: three underscores (_), three equal signs (=), three asterisks (*), three hash marks (#), and three tildes (~). Each one is different. Who says word processing ain't fun?
Create table at first seems kind of wacky, but it can be useful, I guess. Type a plus sign, some hyphens, another plus, another bunch of hyphens, and a final plus, like this, and then hit Enter:
+—————————+———————————————-+
Your conglomeration of plus signs and hyphens turns into a table, with the cursor already inserted and ready to go in the first cell.
To add further cells, press the Tab key so you're in the second cell, and then press Tab again. Presto, another row. Keep going until you have all the rows you need, and then start filling in your table. Now, to be honest, I probably will continue using the Insert Table button to create new tables in my documents, but this can be handy. At the least, you won't be surprised when you type some hyphens and find yourself with a horizontal rule or a table.
Apply Styles and Replace Custom Styles are mirror images of each other, even at the level that the first works while you're typing and the second works only when you specifically tell OOo to do it. Apply Styles literally does that: it turns what you type into the styled headers for Heading 1 through Heading 8. If you type a short phrase without a period at the end and then press Enter twice, that line turns into Heading 1, which on my machine is 18pt. Arial Bold. If you press Tab on the next line and then type another short phrase, again without a period, and then press Enter again, you just created a paragraph styled to Heading 2, 14pt. Arial Bold Italic on my laptop. And so on. The more Tabs you put in, the larger the header number, all the way up to eight tabs, which produces Heading 8 (75% Arial Bold). If you're just setting up your document, this can be tremendously helpful. However, while I use OOo Styles religiously, I generally have pre-determined formats for my writing, so I don't need this feature. You might find it useful. Try it and see.
Replace Custom Styles, on the other hand, removes all your carefully placed styles and reverts every paragraph back to the default "Text Body" style. Be very sure that this is what you want before you tell OOo to go ahead (yes, I know you can undo, but still).
And now one that a lot of people don't think about: Replace "standard" quotes with "custom" quotes. Instead of the straight up-and-down apostrophes and quotation marks, you get what OOo calls "custom" quotation marks, and what others call "curly" or "fancy" quotation marks. This is a good thing, and you probably should enable it. Here's the skinny.
In order for your fancy quotation marks to work, you have to go to the Custom Quotes tab in the "AutoCorrect" window and check both boxes next to Replace.
In 1989, a writer named Robin Williams (no, not that Robin Williams; this one is a woman, for one thing) published a very influential book titled The Mac is Not a Typewriter. In it, she argued strenuously against the use of straight quotation marks and in favor of their curly brethren. Her main arguments were that straight apostrophes and quotation marks were actually only supposed to be used as symbols for feet and inches, like this—6' 2"—and that curly quotations marks were prettier than the straight alternative.
It is definitely true that you should use straight marks as symbols for height. Fancy quotation marks would look pretty silly if you were writing someone to tell them about your fancy new 6 foot tall privacy fence. And from an aesthetic perspective, curly quotation marks do look nicer than the straight up-and-down ones. So let OOo take care of the dirty work here, and convert all your plain Jane marks to fancy marks. You'll look like a professional typesetter in no time.
If you want to actually use straight marks for inches and feet, you can insert them by going to the Insert menu and choosing Special character …, and then finding the symbols you need. Usually they're on the first row. Make your selection, press OK, and you're done.
Finally! We're at the last item on the Options tab: Combine single line paragraphs if length greater than 50%. The idea behind this setting is to join together several paragraphs, if \1ach paragraph is only one line, and if \1ach paragraph is longer than 50% of the width of the page. Personally, I could see how this would be disastrous if you were composing fiction and your dialog got smooshed together, so I would avoid it. If, however, you'd like to change the number from 50% to something bigger or smaller, select the option and the press the Edit button at the bottom of the window. In the resulting window, change your number and press OK. There you go: customized to your liking. Just be careful.
The next tab is Custom Quotes.
Custom Quotes look nice, and they're easy to set in OpenOffice.org.
These settings works in conjunction with the Replace "standard" quotes with "custom" quotes setting on the Options tab, discussed previously. If you check the two boxes next to "Replace" on this tab, but you don't check the boxes next to Replace "standard" quotes with "custom" quotes, then you really won't accomplish anything, since they work together.
There's one final tab in AutoCorrect that we need to examine: Word Completion.
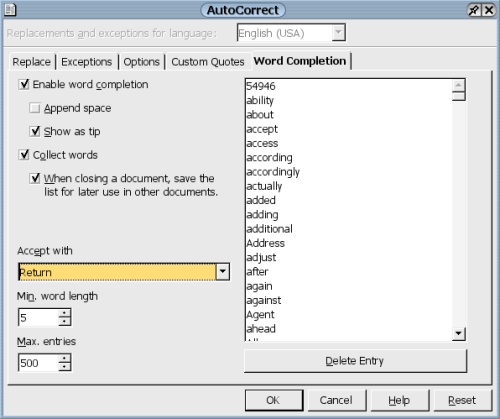
Automatically complete words you're typing with OpenOffice.org.
Word Completion is a feature that people either love or hate. Me, I love it. But I do have several friends who have called me after a few days using OOo to beg, "How the heck do I turn off this crazy feature that keeps trying to complete everything I'm typing?!" First, let me give you the quick answer you may be looking for: if you dislike the crazy feature that's trying to complete everything you're typing, simply remove the check next to Enable word completion. End of problem.
In OOo Calc, go to the Tools menu, then choose Cell Contents, and then uncheck AutoInput.
Now, for the rest of you who like Word Completion and would like to use it more effectively, let's take a look.
First, how does Word Completion work? Basically, OOo watches what you're typing in all documents and keeps an index of all words that are longer than five letters. When you type a new word and get to the third letter, OOo guesses what you're trying to type, based on the index it has of previously-typed words, and offers a suggestion. If you accept the suggestion, OOo inserts it into your document and your cursor jumps ahead so you can type the next word. If you do not accept the suggestion and instead continue typing, OOo continues offering suggestions to fit the letters you're typing.
A simple illustration may make this clearer. Let's say that you've used the words "added," "adding," and "additional" in a paper. You begin typing and get as far as "add." At that point, OOo will suggest "added." If you hit the Enter key, OOo places the word "added" into your paper. If you continue typing so that you now have "addi," OOo will offer "adding." Hitting Enter places "adding," while continuing to type so that you have "addit" allows you to finally take OOo's suggestion and insert "additional." Written out like this makes it seem tedious, but it actually happens pretty quickly as you type.
The index that OOo creates is an aggregate, based on anything typed using OOo, so don't be surprised if a word you used in one document shows up as a suggestion when you're typing in another, different document.
To use Word Completion, you must check the box next to Enable word completion. Now you have a choice to make: do you want OOo to add a space at the end of any word it completes for you? I personally find this annoying, especially at the end of sentences where I don't want a space, so leave Append space unchecked.
Now you have another big choice: how do you want OOo to communicate its suggestion to you? If you do not \1heck Show as tip, which is the default, then you will see behavior like this, in which OOo offers to complete the word "Personal" below as "Personally."

OpenOffice.org offers to complete a word for me, without showing it as a tooltip.
If, on the other hand, you check Show as tip, then you would see this behavior instead:

OpenOffice.org offers to complete a word for me, showing it as a tooltip.
In the first example, OOo shows its suggestion inline with your text; in the second, OOo displays it in a tooltip that appears above and to the right of the word you're typing. I used the first method for quite some time, but I've switched to the second, and I find it far easier and far less jarring. In fact, I now think that the first method, with its sudden interpolation of letters into the copy they're writing, is what most people find so annoying about the Word Completion feature. Of course, other people may find tooltips just as annoying, so I guess we're back at the cardinal feature of open source software: choice!
If you want Word Completion to work at all, you also need to check Collect words, or OOo won't have anything to suggest. If you'd like the list that OOo gathers from your current document to carry over to other documents, be sure to leave When closing a document, save the list for later use in other documents checked as well.
On the bottom left of the Word Completion tab are three settings that control how you interact with this particular feature. Accept with defines the key with which you accede to OOo's suggestions. The default is Enter, which has always served me well, but you can also choose other keys, although they're not nearly as convenient for a typist as Enter. You set the minimum number of characters for words that you want OOo to collect using Min. word length; 5 is the initial setting, and I've always found this to be a good number. Finally, Max. entries governs how many words OOo stores in its list of suggestions. If you really love the feature, maybe you should bump it up from the initial setting of 500.
The actual list of words is on the right side of the tab. If you find that OOo is giving you a bad suggestion, you can delete it here. For instance, I accidentally typed "Micorsoft" one time, and after that, OOo was constantly suggesting the wrong spelling every time I started to write about our favorite convicted monopolist. To get rid of my mistake, I selected it in the list and then pressed Delete Entry. Problem solved.
Again, as I mentioned previously, if you're constantly misspelling something, you can set AutoCorrect to fix it for you every time.
Hey, guess what? We're done configuring AutoCorrect! Even more, we're done configuring OpenOffice.org! Now let's get some work done.