This is part of a book I was asked to write in 2003-2004 about open source software. Unfortunately, the book didn't end up getting published. This particlar section is from a chpater on OpenOffice.org 1.1.0, which is now completely out of date. Nonetheless, there's still some good information here that might be helpful to someone, and I thought this section might be at least of historical interest.
In these days of gargantuan hard drives, when a 40-gigabyte drive is considered small, it might seem silly to worry about compressing files and folders. But it's still an issue for most computer users. After all, backups are more easily done with compressed files, especially now that CDs are starting to seem small (Can't you hear it now? "Only 640 MBs?! I can't fit anything on there!"). More importantly, now that Microsoft has blocked its ubiquitous email program Outlook from receiving any attachments except zipped files in an effort to improve security on that woefully insecure software (See my "Securing Outlook, Part Two: Many Choices to Make," available on SecurityFocus at www.securityfocus.com/infocus/1652), it is even more important to have software available that will compress and uncompress files and folders easily and efficiently.
There are many commercial, proprietary programs that will do that. But we want an open source alternative, and that's what we're going to get! Fortunately, there are great programs available for Windows and Linux that will meet our needs. Why nothing for Mac OS X? Because it seems that Aladdin Systems' proprietary StuffIt and StuffIt Expander so dominate the market that there are no open source compression/decompression programs available. Let's hope someone takes up the slack and develops something open for Mac OS X users everywhere.
StuffIt Expander is free in cost, but it is not free in license, and the source is definitely closed. It will expand files in a large variety of formats, including SIT, ZIP, UU, HQX, GZ, TAR, TAR.GZ, BZ2, ARJ, RAR, & compress. You can download it for Windows, Linux, and, of course, Mac OS X, at http://www.aladdinsys.com.
Mac OS X has an easy-to-use GUI-based compression tool with StuffIt Deluxe and StuffIt Expander (too bad they're not open source …), and Windows has 7-Zip. What do Linux users have?
Most of the time, Linux users proudly respond, "The command line!" It's certainly true that the command line suffices for many Penguinistas (it's fast and actually pretty easy to use once you've mastered the commands); however, not everyone finds the command line to be a user-friendly solution. For those folks, there's File Roller.
File Roller supports a lot of formats, including TAR, GZIP, BZIP, BZIP2, ZIP, LHA, RAR, LZH, EAR, JAR, and WAR It's easy to use and powerful. Officially a GNOME tool, it works just fine under KDE.
Installation & configuration
Most Linux distributions come with File Roller. Red Hat, for instance, includes it, as well as Debian, SUSE, and Yellow Dog Linux. To find out if it's on your Linux box, open the command line and type whereis file-roller. Usually it's at /usr/bin/file-roller, but your distribution may have placed it elsewhere.
If File Roller is already installed, great. If not, install it from your distribution's CDs, use apt to get it by running apt-get install file-roller, or download it. If you're using an RPM-based distro, search for File Roller at RPMfind, located at http://rpmfind.net, and download an RPM appropriate for your system. If you're still out of luck, grab the source code at the SourceForge project page -http://sourceforge.net/project/showfiles.php?group_id=41098- and compile it. Make sure you get the version of File Roller appropriate for your version of GNOME (translation: most people will want to scroll down the page, to GNOME 2.0 or 2.2).
Once you've installed File Roller, start it from the command line by running file-roller, or look for an icon on your menus. To configure it, go to the Edit menu and choose Preferences.
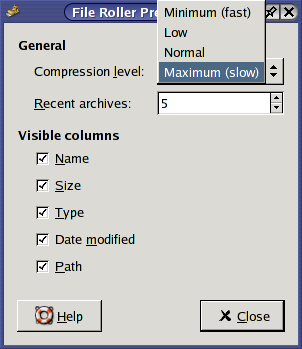
The File Roller Preferences window.
As you can see, there's not a lot to do here. I would change the "Compression level" to Maximum (slow) for the reasons I gave in my discussion of 7-Zip; basically, the better the compression, the longer it takes to create the archive, but if your computer has a modern processor, you probably won't notice a problem. You can change "Recent archives" to a number higher than 5 if you use File Roller a lot and have a need to keep returning to the same archives over and over, but most people will be fine with the default. I would leave all the "Visible columns" checked, as I can't think of a good reason not to. Press Close and you're done. Simple is nice, isn't it?
Compressing files & folders
Now that we've installed File Roller, it's time to use it. Compressing is a relatively straightforward affair, but there is one difference between Windows and Linux: File Roller does not integrate itself into the context menu that appears when you right-click on files and folders. Instead, you have to open the program to create an archive. Not a biggie, really.
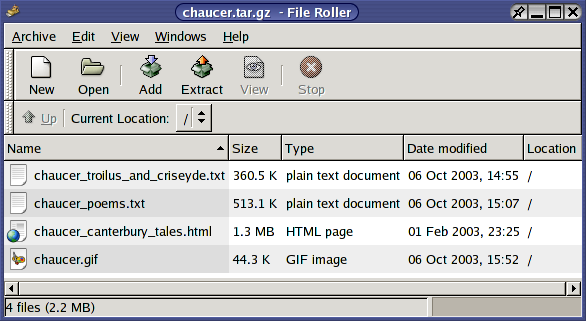
So let's go back to our 1,371 kb file of Chaucer'sCanterbury Tales. To compress it using File Roller, first open the program. Press the New button on the toolbar, or select the Archive menu and then New.
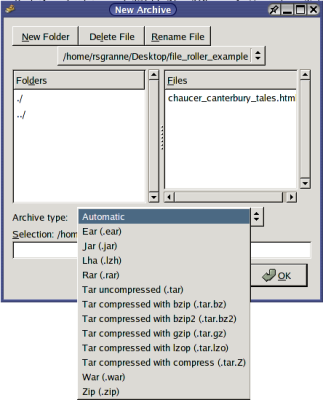
Compressing a file with File Roller.
First, select the type of archive you wish to create. In our case, let's create a TAR archive that's then compressed with GZIP, resulting in a file with an extension of ".tar.gz," one of the most common archives you'll find on a Linux box. In the textbox labeled "Selection," we need to type in the name of the archive we're creating. Since we're compressing a long poem by Chaucer, let's call this archive, cleverly enough, "chaucer" (without the quotation marks, of course). Then press OK. Note that File Roller automatically appends the ".tar.gz" onto the name of the archive we typed, so that the complete archive is now named "chaucer.tar.gz," exactly the way we'd want it.
You should now find yourself back in the main File Roller window, but the title bar will say "chaucer.tar.gz," the name of our archive. We've created an archive, but there's nothing in it yet. Our next step is to add some files to the archive. As we do, File Roller will transparently convert them to the .tar.gz format, or whatever format we chose.
To add the Chaucer HTML file, press the Add button on the toolbar, or select the Edit menu and then Add Files ….
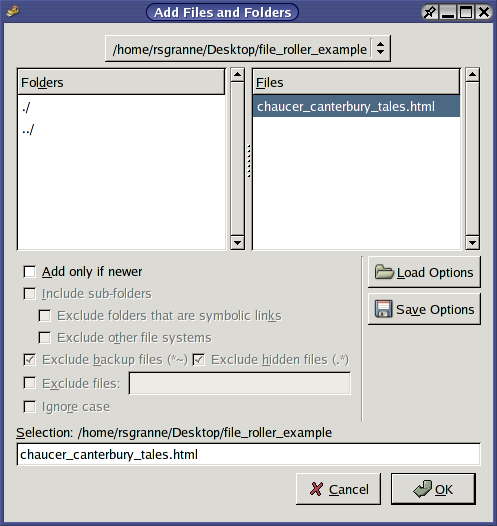
Add a file to your File Roller archive.
The main purpose of this window is at the top: find the file that you want to add to your archive, select it, and then press OK. However, File Roller presents you with several options. Check "Add only if newer" if you're choosing a file that may already exist in your archive, and you want to add it only if the newly-chosen file is newer than the one already in the the archive. Since this is the first time I've added "chaucer_canterbury_tales.html" to the archive, I don't need to toggle that choice on. The rest of the choices are grayed out because they are for folders; more on them in a moment.
At this point, we're finished with our task. If we intend to create further archives, then we need to leave File Roller open but close the Chaucer archive. To do so, go to the Archive menu and choose Close. If you're finished with File Roller completely, simply close the program.
If you take a look at the results of our work, you'll find that our 1,371 kb file containing theCanterbury Taleshas become a 438 kb .tar.gz file, roughly equivalent to the compression we encountered with 7-Zip and the ZIP file format.
What if we want to add more files to our archive? Chaucer wrote more than theCanterbury Tales, after all. How aboutTroilus and Criseyde? And don't forget "The Book of the Duchess," "The House of Fame," and "The Parliament of Birds."Troilus and Criseydeis a 361 kb text file, and the other poems add up to a 513 kb text file. For good measure, let's include a picture of Chaucer as well, a file named "chaucer.gif" that is a 44 kb image. Let's add them to "chaucer.tar.gz" and see what we get.
To add these three new files to our archive, we first need to open File Roller, and then open the archive to which we wish to add files. To open our "chaucer.tar.gz" archive, press the Open button on the toolbar, or choose the Archive menu and then Open …. Navigate to the archive, select it, and a few seconds later it should be open in File Roller.
We didn't need to choose Open … on the Archive menu; instead, we could have gone to Open Recent and selected "chaucer.tar.gz" from there, since it was one of the last five archives with which we had worked.
Adding files to an archive is pretty easy. Press the Add button on the toolbar, or choose the Edit menu and then Add Files …. Navigate to the location of the files you wish to add and select them. To choose more than one file at a time, hold down the Ctrl key on your keyboard if you wish to select files that are not next to one another, or, if you wish to grab several files that are listed next to each other, click on the first one and then press the Shift key on your keyboard as you click on the last one. After you've made your selections, press OK. You should see your new additions show up in your File Roller archive shortly.
The four files we've been using together total 2.2 MB, but compressed into a .tar.gz file, they come out to 821 kb. Not too shabby!
Uncompressing files & folders
File Roller can also be used to uncompress archives. Unfortunately, File Roller does not integrate itself into the context menu that opens when you right-click on an archive, unless you do so manually for every archive file type that you wish to open with File Roller. Or you can just open File Roller, navigate to the archive, and open it that way. Let's look at the latter method, as it's a bit simpler.
Open File Roller, and then press the Open button on the toolbar, or select the Archive menu and then Open …, and navigate from there to your archive. Once you have it selected, press OK. In a few seconds, the archive should open up in File Roller so you can see the list of contents. Our "chaucer.tar.gz" archive looks familiar.
Opening an archive using File Roller.
To get the files out of the archive, press the Extract button on the toolbar, or select the Edit menu and then Extract to …. You will see the Extract window open up, with several choices to make.
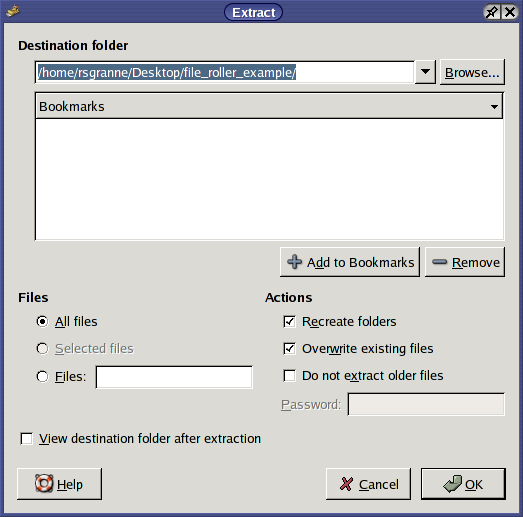
Extracting files using File Roller.
Let's walk through this menu. "Destination folder" is asking just that: where you wish the extracted files to go. Press the Browse… button and make your choice. If you constantly extract files to a particular location, make sure it's selected, and then press the Add to Bookmarks button. The path will appear in the "Bookmarks" area, and you choose it in the future with just one click.
If you didn't choose any specific files in the listing that appeared in the File Roller window, then you are basically constrained to expanding all the files; however, if you had instead chosen one or more specific files, then both All files and Selected files would be options, and you could choose as necessary. The "Actions" choices on the right side of the window are pretty self-explanatory. I do recommend, however, that you leave Recreate folders checked; otherwise, you may end up with files everywhere.
If you select View destination folder after extraction, then the Nautilus file manager will open once the extraction has completed, if it is installed on your system. Yes, Nautilus is a GNOME application, and it looks a bit weird opening up in my KDE, but remember, File Roller is a GNOME application as well, so it's not surprising. Generally, I leave this unchecked, as I don't use Nautilus and instead use KDE and the Konqueror file manager, but GNOME users may want to check the box.
Further information about File Roller
The main File Roller Web site can be accessed at http://fileroller.sourceforge.net. At the site, you can get the basic information about the software: the latest news about development, downloads, screenshots, and how to contact the main developer.
Further details can be found at http://sourceforge.net/projects/fileroller/. Here you can track bugs, make feature requests, and download binaries in RPM format and source code if you wish to compile File Roller yourself.
Summary
File compression is one of those gotta-have utilities that every computer user needs. Fortunately, Linux has File Roller. It's free in cost and in code, and it works well. As the world becomes more and more networked, compression continues to gain in importance, and it's good to know there are open source tools available that enable us to make use of the wide variety of compression formats available.